Daymare Town 4


dmt_comparison_dmt4

 play this game | vinyls

reviews: Jay is Games | Indie Statik | PC Gamer | Polygamia

more reviews: indievault.it | Game Exe | Scribbler.cz | Bubble News

walkthrough: video | english

devlogs: #1 | #1 timelapse | #2

let’s play’s: Mage | Pixzule

Pixel Heaven 2014

update #1 [15.IX.2013]

As it turns out, I can’t stop working on this game… I’ve been doing it for so long, that now that it’s over I’m looking for any excuse to open the files and just change things. First of all – fixed few minor bugs (a big thank you to all people who found them and informed me about them), so once that was sorted out, I figured it’s the high time to finally create my new handwriting font. The old one was too thick – it had to be rendered with thickness filter each time, which was completely “you’re doing it wrong” situation. Besides – that font was missing lots of glyphs, even the important ones, mostly punctuation. Because of that lots of dialogue was looking weird. Not anymore. I created my new font and replaced every text instance within the game, so there’s that. I believe this deserves being mentioned. If you bought the game – you can re-download using your link, if you didn’t – you can play online, the free version was updated as well.

update #2 [29.IX.2013]

Nobody told me that the footer looked like shit. :D I couldn’t see it, because I HAVE that game font installed on my machines. I spotted that problem on Pixzule’s let’s play, once you see it you can’t un-see, so I had to dig in and update the game once again. All of my games use Arial for the footer, it’s crystal clear when is played in small size. But no, this time I had to change ALL fonts in the game (remember?) so while all in-game fonts are neatly embedded and displayed just fine – that footer textfield wasn’t embedded (Arial looks better this way). Hence the problem. Embedding the font in the footer textfield did the trick.


Daymare Town 4, english walkthrough


Sea of Smoke

You start the game in the middle of a desert. Click the right side of the area to turn right.
Now you should see a cave on the left and a row of stairs on the right. Click the stairs to walk towards them.
From there, go down through the arch way at the middle of the stairs to enter a building which contains a smaller staircase.
Go down these stairs to a small room with five pegs on the wall.

Pick up the COG WHEEL (1) on the right side of the floor.

Go back up the stairs to exit the building, then move back twice to return to the starting zone.
Now click the left side of the desert area to turn towards a hill with a forked road.
Follow the path on the right and continue to move right until you reach the Resin Gate.

Resin Gate

Once you reach the gate, move right one more time to find a makeshift bridge.

Click the bottom of the shadowy area underneath the bridge to zoom in.
Pick up the COG WHEEL (2) from the ground, then click the top of the scene to zoom back out.

Move left four times to return to the fork in the road.
This time, take the left path up the stairs. Climb up until you reach the entrance to the House of the Dragon.

House of the Dragon

Click the bottom of the tower to enter the base floor of the building.

In the middle of the wall under the stairs, you’ll see a Wall Safe which may contain some junk items.

Click the bottom of the screen to turn around towards the back wall.

Take the BACKPACK hanging from the left hook on the wall.

You can click the BACKPACK in your inventory to open it. Simply click other items to switch them between the backpack or your inventory.
This is the most convenient way to store any objects, especially junk items. Note that an item cannot be used while it is in your backpack, it must be switched back into an empty space in your inventory before you can use it again.

Turn back around and go up the stairs to the second floor. Click the ladder once to climb to the middle.

Examine the window at the middle of the tower.
Take the CRANK on the windowsill.

Move back and continue up the ladder to the top of the tower.
Click the bottom of the floor to turn around towards the other side of the room.
Press the button at the center of the circular window on the wall to open it, revealing a mechanism.

Place the two COG WHEELS on the round pegs of the window mechanism.

Click the sofa to move it aside, which will uncover a socket at the middle of the floor.

Insert the CRANK into the socket, then click the crank to operate the mechanism – this will open the Resin Gate you passed by earlier.

Exit the tower and go all the way back to the fork in the road, then follow the right path until you return to the Resin Gate.

Resin Gate

Click the open gate to enter the tunnel.
There’s an object in the middle of the floor “encased in resin,” use the HAMMER four times on the resin to break it.

Take the freed BELL from the broken resin on the ground.

Move back once to exit the gate, then walk left three times and back twice to return to the starting scene of the game in the Sea of Smoke.

Sea of Smoke

From the starting scene, walk right twice to return to the large stairway.
Click the column on the left side of the top of the stairs to approach it.

Now click the top of the column to zoom in and find a BULB FUSE.

Back up twice, then move towards the archway atop the right side of the stairs.

Attach the BELL to the end of the rope hanging from the archway.
Hit the BELL with the HAMMER to call for the elevator.

Enter the elevator, then push the lower button to ride it down to the Seaweed Fossil Chasm.

Seaweed Fossil Chasm

Back up twice to exit the elevator. Walk left across the bridge to face the chasm, then walk right to reach the stacked houses.
First enter the middle house by clicking the doorway directly above the sword and shield.

The broken switch at the middle of the wall has a bulb on its left side, but the one on the right is missing.
Place the BULB FUSE (from the column at the Sea of Smoke) into the empty socket on the right side of the switch to repair it.
Click the switch to pull it down. It should now stay locked into the lower position.
Move back to exit the room.

Next, click the lowest doorway that’s to the right of the building you just left.

Pull the handle that’s hanging from the ceiling to open the door to a different building outside.
Since you pulled the switch in the other room, the hatch in the middle of the floor should be open.
Go down into the hatch to find a FUSE (1) at the bottom.
Climb back up and move back once to exit.

The door to the upper left building should now be open since you pulled the handle. Click the open door to enter the kitchen.

Take the FOSSILIZED BREAD ROLL on the floor at the rear left corner of the room.
Back up to exit the building.

Move right once to reach a new area with a stone outcropping hanging over the edge of the cliff.
There are two small caves here in the rock wall, click the right cave to move towards it.

You should see a figure here with outstretched arms who says it “cannot… reach… stone…”
Give it the FOSSILIZED BREAD ROLL. In exchange, it will leave you a CONTROL WHEEL.

Move back, then walk right twice. Continue right through the small tunnel in the wall until you reach a cavern on the other side.

At the right side of the cavern is an oil pump mechanism.

Open the small door at the front of the mechanism and place the FUSE (the one from the bottom of the hatch, not the bulb fuse) inside the empty compartment to power the machine.

Walk left four times. You should now be standing at the top of a sandy hill (going down it leads to a spikey gate) and a single doorway in front of you with a ladder leading up to it. Go through the doorway to enter the room.

Move towards the right side of the room to find another set of machinery. You should also see an oil gauge on the wall with a bar that is nearly full, since we already powered the oil pump.
Put the CONTROL WHEEL into the dome shape at the top of the machine.

Click the handle at the upper left section of the wheel to turn it.
The bars at the right side of the machine should now be lined up and the gate outside should now be open.

Go left once and back once to leave the room. Now that the gate is open, you can move back two more times to walk down the sandy hill and into the Deep Fog Trench.

Deep Fog Trench

Once you reach the bottom of the hill after the animation, click the right side of the screen to turn right towards the fence.

Take the STEEL PIPE sticking up from the middle of the fence, just a bit to the left of the large cross-shape.

Take one more step to the right to follow the fence a little further.
Click the area between the two middle posts of the fence to move towards the desert behind it.

Pick up the CRYSTAL BALL lying in the sand.

Back up to return to the fence, then walk right twice to find two little men. From here, turn right to face the desert horizon.

Examine the skull lying in the sand at the left side of the scene.

Look inside the skull’s mouth to find a CHARON COIN (1).

Move back three times to return to the two men.

In the distance, you can see three faded structures. Click the left area of the screen to walk towards the towers, then approach the left building of the Fog Folk Hive.

Fog Folk Hive

Click the doorway of the left tower to zoom in.

The entrance is boarded up, but you can break it open by hitting each of the boards with the HAMMER.

Enter the left tower and go up the stairs into the attic.

Pick up the KNIFE lying on the right side of the floor.
Go back downstairs, then exit the building.

Move towards the large structure in the middle next.

There are three doorways at the bottom of the tower that each lead to a different series of tunnels. Enter the middle doorway first.

Click the opening at the top of the tunnel to reach the horn room.

Attach the STEEL PIPE (from the middle of the fence at the Deep Fog Trench) to the end of the horn.

Exit the room and go out the tunnel to return to the view of the three doorways. Enter the doorway on the right next.

This series of tunnels stretches out over multiple scenes. Follow the tunnel up, right, and then to the upper right.

Click the small entrance from the path branching out of the side of the tunnel to enter the statue room.

Look inside the statue’s mouth to find another CHARON COIN (2).

Leave the tunnels and return to the front of the tower. Walk back three times and then left three times to go back to the bottom of the sandy hill at the Deep Fog Trench.

Deep Fog Trench

Click the left side of the scene to turn left towards the odd, tree-shaped structures.
Continue to the left, then walk forward to find a dead monster lying on the ground. Turn right to face it.

Click the monster’s mouth to zoom in and take a CHARON COIN (3).
Next, examine the horns on top of the monster’s head. Remove the CHAKRA, which looks like an oval gem between the two horns.

Move to the right to view the other end of the monster.

Cut open the monster’s stomach with the KNIFE (from the floor in the attic of the left tower at the Fog Folk Hive).
Pick up the FUSE (2) that falls out of the monster’s stomach and on to the ground.
Move left once and then back once to step away from the monster.

Walk forward once. You should see two hooks hanging from the sky. Click the faded structure to the right to discover an oil pump machine.

Open the door at the front of the machine and insert the FUSE from the monster’s stomach to power the machine.

Go back four times and then turn right to face the hill again. Climb up the hill to return to the Seaweed Fossil Chasm.

Seaweed Fossil Chasm

Go up the hill and walk left twice to view the stacked buildings.
Enter the fortune teller’s room through the bottom door on the far left side.

Place the CRYSTAL BALL on top of the pedestal.

Click the ball to travel to the fortune teller.

Pick up the TAROT CARD on the right side of the floor.
Return to the other room by clicking the crystal ball again, then move back to exit the building.

Enter the farthest right building next.

Place the CHAKRA (from the dead monster’s forehead at the Deep Fog Trench) into the hole at the middle of the room.

This will create a Seaweed Newborn, which appears beside the right wall. Click the creature to speak with it.

After your conversation, pick up the SEAWEED ANTENNAE that the creature drops onto the floor.
Move back to exit the building.

Walk right twice and back twice to go down the hill to the Deep Fog Trench once again.

Deep Fog Trench

Turn left once to face the tree-shaped objects. Straight ahead you should see a post with a pulley mechanism at the top of it.

Click the post to walk towards it, where you’ll find the start of two railroad tracks.
Don’t follow the tracks just yet. Instead, click the upper left section of the screen to follow the wall to the left where you’ll see a painting of Charon behind a row of candles and spotted pebbles.

Move left two more times until you reach a staff with three U-shaped prongs at the top of it.

Place the three CHARON COINS into each of the prongs.

The first CHARON COIN was from the skull’s mouth in the desert area of the Deep Fog Trench.
The second CHARON COIN was also in the Deep Fog Trench, but this one was found in the mouth of the dead monster.
The third CHARON COIN was from the statue’s mouth which was located in the side room of the right tunnels at the Fog Folk Hive tower.

Walk right once towards the rows of archways.

Now that you’ve placed the Charon coins, the dome that was previously on the ground has been lifted, revealing another FUSE (3) on the floor.

Move right twice to return to the start of the two railroad tracks.

Click the lower left corner of the screen to view the middle of the two tracks.

Follow the bottom track all the way to the end where you’ll find a closed door.

Insert the TAROT CARD into the card slot that’s just to the right of the door to open it.

Continue through the open door into the Fog Dust Processing Plant.

Fog Dust Processing Plant

Follow the slide down to the lower left two times to reach the base of the plant.
Walk left once to find another oil pump machine.

Open the panel at the front of the machine and put in the FUSE (from under the dome connected to the Charon coins) to start the machine.

Go out the way you came to leave the processing plant. Walk right seven times to go all the way back to the sandy hill at the entrance to the Deep Fog Trench.

From there, walk right four times and forward once to return to the three tall structures. Approach the middle tower to return to the Fog Folk Hive.

Fog Folk Hive

Click the doorway on the left to enter the left series of tunnels.
Go all the way up to the end of the tunnel. Open the door and enter the top room.

Attach the SEAWEED ANTENNAE to the left side of the machine next to the man who says “I cannot fit that fuse in there…”
Pick up the FUSE he drops on to the ground.

Exit the tunnel and step away from the tower to go back to the view of all three structures from the Deep Fog Trench.

Deep Fog Trench

Approach the tall stone structure on the right.

At the right side of the scene you should see another tall, faded object in the distance.

Click the upper right corner of the screen to move towards it – it’s another oil pump machine!

Open the small door at the front of the machine. Insert the fuse to power the oil pump.

Go back twice, then return to the entrance of the Fog Folk Hive tower.

Fog Folk Hive

Enter the doorway on the left once again to go inside the tunnel.
At the start of the tunnel, click the upper left door to open it and enter the room.

Turn the valve at the middle of the room.

This will allow you to use the horn in the other tunnel (but only if you remembered to attach the STEEL PIPE to it, as instructed earlier in the walkthrough!)

Exit the tunnel to return to the front of the tower.

Go through the middle doorway and out the end of the tunnel to return to the horn room.

Pull the handle hanging down from the left side of the horn to blow it.
Now you will be able to locate the skeleton of the sand giant.

Go all the way back out to the Deep Fog Trench once again.

Deep Fog Trench

Move back twice and left three times to reach the sandy hill. Turn left twice and walk forward once to return to the corpse of the dead monster.
From this point, walk forward once, then click the dome sticking out of the sand to move towards it.
Click the right side of the dome to face the front of it, you’ll see now that it’s in fact a sand giant skull.

Sand Giant

Enter the skull and go down the hole into the throat. Continue down to the pit of the stomach.
Click the MIGDULA lying on the middle of the ground in the giant’s stomach to eat it. Now you have the power to see through the fog.

Go up twice and forward once to leave the sand giant’s skeleton and go out to the Deep Fog Trench.

Deep Fog Trench

Click the left side of the screen to return to the back view of the skull. Walk back four times and turn right to arrive once again at the sandy hill.

Now walk right four times and then forward once to the view of the three tall structures.
This time, follow the power lines that lead to the right.
Walk forward once so that you see a figure on the hill to your right and, now that you’ve eaten the migdula, a giant ravine on the left.

Click the ravine twice to enter The Tear.
Climb up the ladder two times to reach the top of The Cliff.

The Cliff

Follow the road at the upper right side of the scene.
Continue along the path until you reach a hooded figure next to a horse and carriage.
Click the hooded figure to speak with them.

author: Trinn | September 10, 2013 6:30 PM


Daymare Town 4, video walkthrough


Barebones walkthrough, without spoiling anything except the path to the ending.
If you’re stuck and looking for a subtle hint on how to finish the game but don’t want to spoil anything else – this is a video for you. I deliberately went through literally on the surface of the game without diving in too deep.


Tetrastych; recenzja na Alei Komiksu


Mateusz Skutnik podchodzi do rysowania kolejnych albumów zadaniowo. A to zrobi 48 plansz Rewolucji „We mgle” w konsekwentnym tempie jednej strony dziennie (w jednym ciągu), a to za jednym posiedzeniem pociśnie minialbum podczas projektu 24 godziny. Czy w końcu najnowsze wyzwanie – zbiór stripów rysowanych z regularnością cotygodniową i zebranych w album wydany przez Wydawnictwo Komiksowe. Czterokadrowe historyjki publikowane były przez rok na forum Gildii w ramach nieco zapomnianego konkursu na pasek komiksowy. Dodać należy, że Skutnik zwyciężył w pierwszej edycji tego konkursu odbywającego się od lutego 2005 roku najpierw na forum Wraka, a od 72 edycji do teraz (na dziś prawie 380 tematów!) pod egidą Gildii. Co ciekawe, nowy album Skutnika nie jest jego pierwszym takim wyczynem, bo pokłosiem tego samego konkursu był też wydany w 2008 roku przez Kulturę Gniewu albumik „Blaki – paski”.

Rysowanie stripów jest dla Skutnika ćwiczeniem, bowiem forma stripu jest wbrew pozorom niezwykle wymagająca. Nie dość, że trzeba czytelnika rozbawić, zaskoczyć lub skłonić do refleksji, to trzeba też być lapidarnym i bezbłędnym. Pasek jest strzałem snajpera. W “Tetrastychu” wychodzi to różnie, ale zazwyczaj na równym poziomie, gdyż autor często trafia w sedno i wyjątkowo rzadko pudłuje. Oczywiście robi to w swoim specyficznym stylu, a jego poczuciu humoru partneruje charakterystyczna oprawa graficzna. Ilustracje są przekrojem od stylu Morfołaków (pojawia się nawet jeden z bohaterów tej serii) aż po malowane impastem niczym pastą do zębów plastyczne landszafty. Wygląda to pięknie. Całość jest spięta narracyjną klamrą w postaci pojawiających się na okładce ptaszków, więc śmiało można powiedzieć, że to komiksowy album od deski do deski (twardych lakierowanych okładek).

Mimo wszystko, można odnieść wrażenie, że “Tetrastych” jest Skutnikową fanaberią, powstałą mimochodem zabawą z nieoczekiwanym efektem w postaci albumowego wydania. Dla fanów rzecz konieczna jako uzupełnienie kolekcji. Jako samodzielne dzieło oderwane od kontekstu konkursu paskowego – po prostu zbiór stripów, które momentami mogą zachwycić, ale wcale nie muszą.

Ocena: 6/10
Autor: Maciej Pałka


Daymare Town 4, jayisgames review


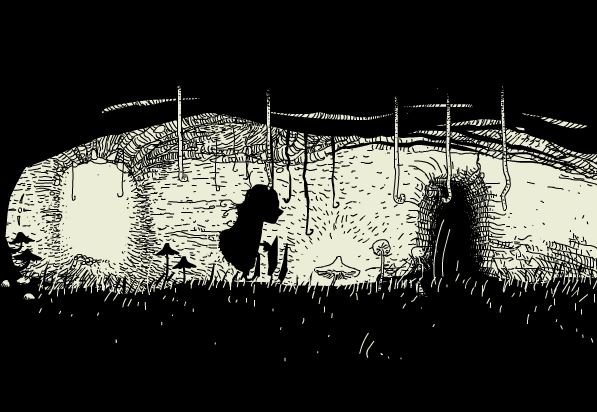
It’s finally happened. You’ve gone beyond the walls of Daymare Town. But what waits for you in the eerie silence of the Sea of Smoke… and beyond? Mateusz Skutnik delivers another creepy-cool yet imaginative point-and-click adventure game with the long awaitedDaymare Town 4. After three years, your chance to explore more of the beloved world has arrived. Just click around to navigate and interact, using the changing cursor as your guide. There is a lot to find and gather up, and not all of it is useful, so make sure to make use of places to store items, or keep your eyes peeled for a backpack to allow you to carry even more.

Chances are if you saw this title and started doing a little squirmy happy dance in your seat, you’re already familiar with its signature brand of surreal, disorienting environments and odd puzzles. In which case, the biggest difficulty you might encounter is navigation, since it’s easy to completely miss a lot of area transitions that aren’t visually indicated onscreen unless you sweep your cursor over them. Chances are if you get stuck, it’s mostly because you didn’t think to try to zoom in on a seemingly innocuous area, or to sweep your cursor along the edges of the screen to see if you could turn around or go another way not indicated. It’s a game that needs you to explore every nook and cranny, to keep your eyes open for clues and try everything. It’s also, as you might expect, absolutely gorgeous, although perhaps with a more unnerving art style to its denizens than before.

Sensitive players also might want to be warned, however, that there is a brief implication of suicide which might be upsetting to some. There’s an overall bleakness to this installment that somehow makes it more unsettling than its predecessors, a grimmer vibe than the Moomin-esque feel it had prior. Daymare Town 4 offers a lot to explore, and continues the series’ tradition of red herrings, allowing you to use some items in the places they don’t really belong to mislead you. (Although as a general rule, in most cases if you’ve put an item in the proper place, you won’t be able to move it again.) It’s a game that sets out to make you feel lost and bewildered and it definitely succeeds. What’s waiting for you out there beyond the Resin Gate, Seaweed Fossil Chasm, and beyond? Only one way to find out. It’s a massive game well worth your time… and if you enjoy it, consider picking up the fullscreen HD version for $5 USD to support the developer who’s given us so much for so long for free.

Author: Dora


Daymare Cat, Polityka review


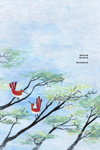
„Daymare Cat” to dogrywka trylogii „Daymare Town” Mateusza Skutnika. Ten utalentowany artysta znany jest głównie jako rysownik i scenarzysta komiksów (serie: „Rewolucje”, „Morfołaki”, „Blaki”), a także jako autor opowieści i scenografii wyreżyserowanego przez Tomasza Bagińskiego filmu „Kinematograf”. Że Skutnik ma na koncie także wiele urokliwych gier, niestety równie powszechnie wiadome nie jest. Są łatwo dostępne – możemy je uruchomić w internetowej przeglądarce za darmo. „Daymare Cat” przypomina interaktywną monochromatyczną kreskówkę. Miniatura ta oparta jest na mechanice gry platformowej z paroma zagadkami. Nie ma tu historii – jest ładna kreska, tajemnicza dziewczynka, nieco surrealistyczne scenerie, niepokojące tło dźwiękowe, niczym śpiewy duchów miriady cykad oraz trafiona piosenka Cat Jahnke, którą będziemy mogli pobrać w nagrodę za ukończenie przygody. Bardzo estetycznej.

Autor: Olaf Szewczyk.


8bit-ninja interview


dmt_black

8bit-ninja:  Could you please introduce yourself an how you got into gamedesign?

Mateusz Skutnik: My name is Mateusz Skutnik, I’m a games architect and graphic novelist. I got into gamedesign around 2002, when I got my hands on the Games factory software. From that I transitioned to more open and user friendly environment of Macromedia Flash.

8bit-ninja:  the “covert front”, “submachine” and especially the “daymare” series feature a great athmosphere and visual style. Could you describe the process of developing the plot and creating the art for your games?

Mateusz Skutnik: the process itself doesn’t have much to do with the atmosphere and style. Those come from my background of being a comic book artist. The process consists of just transferring the story to the medium, whether it be comic book panels or game levels. What I’m trying to say is – I’m a self-learner and I have no idea about a proper process of creating anything. I just create stuff as I go.But everything begins with a story in my head. Then it’s just a matter of telling.

8bit-ninja:  You do not only work on games but also on comic books. what are the biggest differences between working on graphic novels and on videogames?

Mateusz Skutnik: The obvious thing would be interactivity. The comic book is a straight up storytelling, it’s mien, I tell it, you listen and read and that’s it. In games – the story gets a bit watered down in the gameplay, I give clues, the player has to tell the story himself. The trick is to give him just enough clues for the story to be understandable.

8bit-ninja:  Your adventure games with their surreal enviroment and abstract mechanical devices remind me of the myst-series. What (other?) games inspire your work?

Mateusz Skutnik: Mostly other flash games – Crimson Room, Mystery of Time and Space, works of Nanahiro, games from Amanita Design, 100 Rooms. All were brilliant, innovative, artistic. I fell in love with the format of a small flash game.

8bit-ninja:  Point’n click style games seem to work pretty good on IOS devices like the iPad. Have you concidered porting your games (maybe as a compilation?) to an app since those devices do not support flash?

Mateusz Skutnik: We did that 4 years ago. the fact that you don’t even know about it explains how big of a success that was. The thing is – I don’t agree that point and click games work well on iOS devices. PNC is about exploring, searching, finding hotspots on the screen – all done with the mouse pointer. If you remove the mouse from the equation – PNC games tend to be just a confusing mess of not knowing what to do.

8bit-ninja:  The current daymare game – daymare cat – also includes great music from “cat and the menagerie” both in game and as an incentive for completing it. How did this collaboration happen?

Mateusz Skutnik: Cat reached out to me and suggested creating a game together. It was just that simple. Once I listened to her music I knew more or less what I wanted to do. Separate tracks, building a song throughout the game – that was a good idea for a small exploratory game.

8bit-ninja:  Even though you are probably still busy working on Daymere Town 4 do you have any plans on upcoming projects? Will we see more coming out of the daymare and submachine universe or do you want to “slip in a little side project”?

Mateusz Skutnik: After Daymare Town 4 I’ll make another 10 Gnomes game. After that it’s time for Submachine 9 and possibly Where is 2014? game. I’m set till the end of the year. I don’t have plans for 2014 just yet. I’ll surely create the last, 10th Submachine, but after that – all bets are off. Change is good.


—-

[german translation]

8bit-ninja: Stell dich doch bitte einmal vor und wie es dich in die Spieleentwicklung verschlagen hat.

Mateusz Skutnik: Mein Name ist Mateusz Skutnik, ich bin Spielearchitekt und Schöpfer von Comicromanen. Mit dem Spieledesign habe ich etwa 2002 angefangen, als ich das Programm the games factory in die Finger bekam, von dem ich auf die offenere und benutzerfreunlichere Entwicklungsumgebung von Macromedia Flashgewechselt bin.

8bit-ninja: Deine Spieleserien wie covert frontsubmachine und besondersdaymare zeichnen sich durch eine besondere Atmosphäre und visuellen Stil aus. Kannst du beschreiben, wie du bei der Entwicklung der Handlung und der Erstellung der Grafiken vorgehst?

Mateusz Skutnik: Der Prozess selber hat wenig mit der Atmosphäre und dem Stil zu tun als vielmehr meinem Hintergrund als Comicbuchkünstler. Das Vorgehen besteht eigentlich nur darin, die Geschichte auf das jeweilige Medium zu übertragen, seien es die Panels eines Comics oder die Level eines Spiels. Was ich damit sagen will ist, dass ich Autodidakt bin und keine Ahnung habe, wie man “richtig” bei der Erschaffung von Irgendetwas vorgeht. Bei mir entsteht vieles einfach während der Arbeit. Aber alles beginnt mit einer Geschichte in meinem Kopf. Von da an muss diese nur noch erzählt werden.

8bit-ninja: Was deine Arbeit an Comicbüchern betrifft: Worin besteht denn der größte Unterschied zur Entwicklung von Videospielen?

Mateusz Skutnik: Offensichtlich wäre da wohl die Interaktivität. Ein grafischer Roman ist eine gradlinige Geschichte, es ist meine, ich erzähle sie, du hörst zu und liest, und das war’s. In Spielen wird die Geschichte etwas durch die Spielmechanik verwässert. Ich gebe Hinweise, aber der Spieler muss die Geschichte selber erzählen. Der Tick ist, gerade genug Hinweise zu geben damit die Geschichte verständlich bleibt.

8bit-ninja: Deine Adventures erinnern mich mit ihren surrealen Umgebungen und abstrakten mechanischen Geräten an die Myth-Serie. Welche (anderen?) Spiele haben dich noch inspiriert?

Mateusz Skutnik: Hauptsächlich andere Flash-Spiele – Crimson RoomMystery of Time and Space, die Arbeiten von Nanahiro, Spiel von Amanita Design, 100 Rooms. Die waren allesamt brillant, innovativ und künstlerisch wertvoll. Ich liebe das Format der kleinen Flash-Spiele.

8bit-ninja: Point’n’Click Spiele scheinen ziemlich geeignet für IOS Geräte wie iPad geeignet zu sein. Hast du in Anbetracht dessen, dass diese Geräte kein Flash unterstützen, schon mal an eine Portierung deiner Spiele als App gedacht?

Mateusz Skutnik: Das haben wir bereits vor 4 Jahren gemacht [Anmerkung 8bit-ninja: Zu meiner Verteidigung, ich hatte im Vorfeld recherchiert und nichts gefunden]. Die Tatsache, dass du davon nichts weißt, zeigt, wie erfolgreich das war. Übrigens stimme ich dir nicht darin zu, dass Point’n’Clicks gut auf diesen Geräten funktionieren. Das Genre lebt vom Erforschen, Absuchen, davon die Hotspots auf dem Schirm zu entdecken. Das alles geschieht mit dem Mauszeiger. Wenn du die Maus aus der Gleichung entfernst tendieren diese Spiele dazu, ein verwirrendes Durcheinander zu sein, ohne dass man eine Ahnung hat, was man machen muss.

8bit-ninja: Der aktuelle Teil der daymare-Reihe, daymare cat, enthält sowohl innerhalb des Spiels als auch als Belohnung am Schluss großartige Musik von cat and the menagerie. Wie kam es zu dieser Zusammenarbeit?

Mateusz Skutnik: Cat ist an mich herangetreten und hat mir vorgeschlagen zusammen ein Spiel zu machen. So einfach war das. Nachdem ich ihre Musik gehört habe wusste ich mehr oder weniger, was ich machen wollte: getrennte Tonspuren, die im Spiel zu einem Song zusammengebaut werden. Das war eine gute Idee für ein kleines Spiel, in dem es ums Erforschen geht.

8bit-ninja: Momentan bist du wahrscheinlich stark mit deiner Arbeit an Daymare Town 4 beschäftigt, aber hast du schon Pläne für deine nächsten Projekte? Werden wir mehr aus dem Daymere und Submachine- Universum sehen oder würdest du gerne ein kleines Nebenprojekt einschieben?

Mateusz Skutnik: Nach Daymare Town 4 werde ich ein weiteres 10 Gnomes Spiel machen. Danach wird es Zeit Submachine 9 und eventuell ein where is 2014 Spiel. Bis Ende des Jahres bin ich also bereits fest verplant. Für 2014 habe ich noch keine Pläne. Sicherlich werde ich das zehnte und letzte submachine-Spiel machen, aber danach – alles ist möglich. Veränderung ist gut.

8bit-ninja: Vielen Dank für das Interview.


dmt4 – the entrance


dmt_entrance


Daymare Cat, Concept Hunter review


Into Darkness


Step right up into the darkness, kids. Nothing to be afraid of here. There’s a certain feeling of deja vu in this place. I feel I’ve been here before. Like in DMT2…


into_the_darkness


« Previous PageNext Page »